随机向访客展示网站中的一些文章不失为增加访客粘性的一个好方法。最近查了些资料,总结了三种向 WordPress 网站添加随机文章的方法,三种方法各有优点。目前水景一页采用的是第三种方法。
为什么要向访客展示随机文章呢?我一直的想法是将比较有特色的文章列表展示出来,可是现在文章比较多了,维护起来比较麻烦,经常是很久都懒得更新列表。相关文章对于希望了解某一特定问题的访客比较有吸引力,随机文章则可以用另一种方式吸引一些注意力,特别是对于那些目的性不强的访客。当然,最好的推荐文章的方式应该是整个热门文章列表。可是热门文章列表比较麻烦,之前弄了一段时间,后来放弃了。
嗯,废话就不多说了,下面是总结的三种方法。
0. 随机文章的获取原理
WordPress 的文章查询函数 get_posts() 有个参数 orderby 指明了获取文章时的排序方式。通常我们是按照文章发布日期排序,比如 WordPress 站点首页、分类页和标签页中的文章列表。orderby 还可以是 rand,它使用 MySQL 的 RAND() 函数来确定排序参数,也就是随机排序。
使用方法如下:
$args = array( 'numberposts' => 5, 'orderby' => 'rand', 'post_status' => 'publish' );
$rand_posts = get_posts( $args );
这样就能得到随机排序(第 2 个参数)的已发布(第 3 个参数)文章中的 5 篇(第 1 个参数)。
需要特别注意的是,如果没有第 3 个参数,它可能会将草稿之类的文章也显示出来。
1. 向主题模板中添加¶¶
最直接的用法就是修改主题模板,在需要的位置放入下面的代码。
<ul>
<?php
$args = array( 'numberposts' => 5, 'orderby' => 'rand', 'post_status' => 'publish' );
$rand_posts = get_posts( $args );
foreach( $rand_posts as $post ) : ?>
	<li><a href="<?php the_permalink(); ?>"><?php the_title(); ?></a></li>
<?php endforeach; ?>
</ul>
这样就能以列表的形式展示 5 篇带链接的随机文章。
优点:直接,可定制性强(可随意修改展示位置),消耗资源少
缺点:每次升级或更换主题都需要重新修改模板(使用子主题的话可能不需要每次升级都修改)
2. 使用插件
WordPress 插件目录中的随机文章插件还不少。这里列举几个目前比较活跃和有特色的。
- AJAX Random Posts
- 免费;
- 使用 AJAX 技术在页面加载后获取随机文章,兼容 WordPress 缓存插件如 WP Super Cahe,可以在启用静态缓存的情况下保证各个页面的随机文章仍然是随机并随每次访问而变;
- 高度可定制,包括文章数目、HTML 格式、标签(如文章链接、标题、分类、日期等)。
- Advanced Random Posts Widget:
- 免费;
- 高度可定制,包括显示缩略图(可自定义尺寸,但是没有深度加工因而可能比较丑陋)、摘要(可定制长度)、选择分类、日期等,可支持
get_the_image函数和多个挂件。
- Random Post for Widget:
- 免费,简洁;
- 可定制显示文章数目,可排除制定 ID 的文章。
- WPSIREN Random Post by Click:
- 免费;
- 特色是显示一个打开一篇随机文章的按钮,并可对按钮样式进行深度定制。
- Random Post:
- 基本功能免费;
- 提供四种展示效果;
- 可定制显示文章数目、自动更新以及自动更新时间;
- 如果需要选择文章分类则需要购买高级版。
- Random Posts Widget Configurable:
- 免费;
- 可定制显示文章数目。
优点:方便、快捷
缺点:稍微增加了服务器负担;定制化性能取决于选用的插件
3. 修改主题 functions.php 文件
注意:只适用于 PHP 5.2+
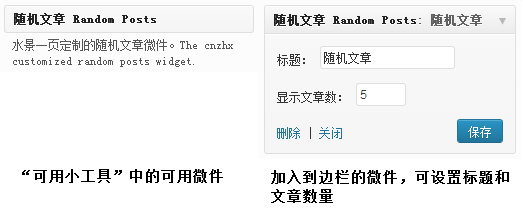
我的需求就是在 WordPress 后台中的“小工具”里增加一个“随机文章”的可用小工具,让我可以将其添加到边栏中作为微件显示出来。
现在我的 WordPress 中插件已经很多了,不希望增加太多的插件造成更多负担,所以就在主题的 functions.php 文件中增加了一个函数类来完成这个任务。
将下面的代码直接,或定制化修改后放入主题的 functions.php 文件中即可。如果当前使用的主题没有 functions.php 文件,可以在该主题的目录下自己创建一个,不过一定要注意在文档的开头输入 <?php,结尾输入 ?>。
成功后在 WordPress 后台的“小工具”页面可以找到对应的可用小工具(左图),添加到边栏后可设置微件标题和显示文章数目(右图)。页面显示效果如本页右上。
代码( // 后为注释):
/**
 * Random_Posts widget class
 *
 * Author: haoxian_zeng <https://cnzhx.net/>
 * Date: 2013.05.14, cnzhx2011 1.0
 */
//--------------- * 注册该微件
class WP_Widget_myRandom_Posts extends WP_Widget {

    function __construct() {
        $widget_ops = array('classname' => 'widget_my_random_posts', 'description' => __( '水景一页定制的随机文章微件。The cnzhx customized random posts widget.' ) );
        parent::__construct('random-posts', __('随机文章 Random Posts'), $widget_ops);
        $this->alt_option_name = 'widget_my_random_posts';
    }

    function widget( $args, $instance ) {
        global $randomposts, $post;

        extract($args, EXTR_SKIP);
        $output = '';
        // 设置 widget 标题
        $title = apply_filters('widget_title', empty($instance['title']) ? __('随机文章 Random Posts') : $instance['title']);

        // 设置要获取的文章数目
        if ( ! $number = absint( $instance['number'] ) )
            $number = 5;

        // WP 数据库查询,使用 rand 参数来获取随机的排序,并取用前面的 $number 个文章
        $randomposts = get_posts( array( 'number' => $number, 'orderby' => 'rand', 'post_status' => 'publish' ) );

        // 下面开始准备输出数据
        // 先输出一般的 widget 前缀
        $output .= $before_widget;
        // 输出标题
        if ( $title )
        $output .= $before_title . $title . $after_title;

        // random posts 列表开始
        $output .= '<ul id="randomposts">';
        if ( $randomposts ) {
            foreach ( (array) $randomposts as $post) {
                $output .= '<li><a href="' . get_permalink() . '">' . $post->post_title . '</a></li>';
            }
        }
        $output .= '</ul>';
        // 输出一般的 widget 后缀
        $output .= $after_widget;

        // 输出到页面
        echo $output;
    }

    function update( $new_instance, $old_instance ) {
        $instance = $old_instance;
        $instance['title'] = strip_tags($new_instance['title']);
        $instance['number'] = absint( $new_instance['number'] );

        $alloptions = wp_cache_get( 'alloptions', 'options' );
        if ( isset($alloptions['widget_my_random_posts']) )
            delete_option('widget_my_random_posts');

        return $instance;
    }

    //
    // 在 WP 后台的 widget 内部显示两个参数, 1. 标题;2. 显示文章数目
    //
    function form( $instance ) {
        $title = isset($instance['title']) ? esc_attr($instance['title']) : '';
        $number = isset($instance['number']) ? absint($instance['number']) : 5;
        ?>
        <p><label for="<?php echo $this->get_field_id('title'); ?>"><?php _e('Title:'); ?></label>
        <input class="cnzhx" id="<?php echo $this->get_field_id('title'); ?>" name="<?php echo $this->get_field_name('title'); ?>" type="text" value="<?php echo $title; ?>" /></p>

        <p><label for="<?php echo $this->get_field_id('number'); ?>"><?php _e('Number of posts to show:'); ?></label>
        <input id="<?php echo $this->get_field_id('number'); ?>" name="<?php echo $this->get_field_name('number'); ?>" type="text" value="<?php echo $number; ?>" size="3" /></p>
        <?php
    }
}

// register WP_Widget_myRandom_Posts widget
add_action( 'widgets_init', create_function( '', 'return register_widget("WP_Widget_myRandom_Posts");' ) );
优点:比方法 1 费资源、比方法 2 省资源,可定制化程度极高
缺点:麻烦
以上内容没多少技术含量,仅仅综合利用了网上的资源。请在评论中留下您的观点。©
本文发表于水景一页。永久链接:<https://cnzhx.net/blog/wordpress-random-posts/>。转载请保留此信息及相应链接。

感谢分享 决定使用第三个
我也是倾向于第三个。不过第三个方法在升级主题的时候也需要注意备份 functions 文件,只是比较方便随时调整位置和或者撤下。
不错,学习了,谢谢分享,正好用上
不会代码。插件又不想用,如何是好
那就用现成的代码啊。文中都有。
不错,学习了,谢谢分享,正好用上
我的博客,使用了上面方法,不行呢,爆PHP源码
刚才检查了一下,代码(第3种方法)的最后一句中少了个 return,现已加上。不知道是不是这个问题导致的?
我想把这个挪用到woocommerce一样随机显示产品呢?可以给指点一下吗
对不起,woocommerce 没接触过,对你提的问题没什么概念。
我用第二种,直接在文章页面添加,添加在侧栏,有时候读者会看不到。
是说第二个插件吗?你可以检查一下没出现这东西的页面的源代码看看是什么原因。